Hi!
Jaymes here - first of all, for those of you who celebrate, I hope you had a great Thanksgiving, and for those of you who don’t celebrate Thanksgiving but do enjoy some Black Friday/Cyber Monday shopping, I hope you find some fantastic bargains!
Today, I’ve got a few items I think you’ll enjoy:
- With Black Friday and Cyber Monday upon us, there are plenty of fantastic discounts on photography products, so I’ll share a few of my favorites (and direct you to our Black
Friday deal roundup post, which includes plenty more!).
- We’ve got another dPS bi-weekly challenge for you (and this one is holiday-themed!).
- I share a four-step approach to help you create amazing background blur in your portraits, wildlife photos, macro photos, and more - the kind that’ll impress even professionals.
- I got a lot of positive feedback after last week’s section critiquing some of your images, so I’ve included a few more critiques this week!
Now, let’s dive right into the good stuff:
Black Friday/Cyber
Monday deals for photographers
With the holidays coming up, the deals and discounts are in full force, which means that you have opportunities to save big on gear, software, and educational products - whether you’re buying for yourself or you’re in search of gifts for other photographers in your life.
To help you out, we’ve just published a guide to the best Black Friday deals for photographers. Here are some of the
highlights:
- The Photzy Action Cards: These cards simplify the photography learning process by breaking down essential techniques into 65 easy-to-understand cards. Right now, they're available at an incredible 88%
discount.
- ON1 Photo RAW 2024: This user-friendly, feature-rich alternative to Adobe Lightroom Classic is currently just $79.99 for a lifetime license - an unbeatable deal!
- The Landscape Photography Guided Resource Kit: Tailored for beginner landscape photographers, this kit includes nearly 20 top-notch resources to elevate your images, now at a whopping 94% off.
- Skylum Luminar Neo: This powerful,
beginner-friendly photo editor, loaded with AI tools for enhancing your images, is available for just $119 for a 24-month subscription
For more great deals, including significant discounts on cameras and lenses, make sure to check out our in-depth Black Friday deals article.
From Sime: If you celebrate Thanksgiving, this challenge is for you. If you don't celebrate Thanksgiving, this challenge is for you! (You can be thankful for that)
You can share a photo, or up to five photos as a series of how your
Thanksgiving went, or, you can share a photo or a series of five photographs of something you've been thankful for in the last year.
Make sure you include the hashtags #dPSWeeklyChallenge and #dPSThanksGiving in your post, in the comments of our official weekly challenge page, or over on social media. You can tag us on Facebook, Instagram, or Twitter!
And you can also share your
image(s) in the dPS Facebook group!
A four-step system for stunning background blur
Professional photographers love to include
smooth background blur (also known as bokeh) in their images; it pushes the viewer’s eye toward the main subject, and it also looks jaw-droppingly gorgeous.
While intense bokeh effects might not be suitable for expansive scenes like landscapes or cityscapes, they work wonderfully in portrait, wildlife, macro, and
product photography.
And achieving this effect is simpler than you might think. Here’s how:
Step 1: Use a longer focal length
Longer lenses are known for producing smoother backgrounds. Rather than opting for a wide-angle lens, try zooming out to at least 50mm. If you can extend to 85mm, even better, and 135mm will provide an even smoother effect!
Step 2: Move closer to your subject
The closer you are to your subject, the more pronounced the background blur becomes. Aim to frame your subject reasonably tightly. For example, in portrait photography, a close-up headshot will yield more impressive bokeh
compared to a wider shot taken from a distance.
Step 3: Use a wide aperture
Unless you’re using a fixed-aperture lens, your camera likely allows
you to adjust the aperture setting.
(What is the aperture? It’s a hole in your camera’s lens that widens or narrows to control the amount of light hitting the sensor.)
Apertures are indicated by f-numbers, with wider apertures like f/1.8 and f/2.8 creating stronger bokeh compared to narrower apertures like f/8 or f/11. So for the strongest blur effect, aim for the widest aperture your lens allows.
Step 4: Ensure background elements are far from your
subject
This is a crucial yet often overlooked aspect of creating smooth background blur. Even if you’ve nailed the first three steps, the distance between your subject and any background elements (like trees, buildings, or cars) significantly affects the smoothness of the bokeh.
You can achieve a greater distance by positioning yourself or your subject differently. For instance, crouching low can make nearer background elements fall away, or moving to the side can align your subject with a more distant background.
And if you’re doing a portrait photoshoot, you can always ask your subject to take a few steps forward, away from the background.
If you follow all of the steps I’ve detailed above, you can create stunning backgrounds with any equipment.
(If you have any questions, feel free to send me an email - just hit Reply to this message! - and I’ll do my best to get back to you!)
Critiquing your photos
I really enjoyed critiquing your photos last week, and it seems like the community found it helpful, because I got a lot of positive feedback!
So if you like the critique section and would enjoy seeing more critiques in the future, do let me know.
Also, if you would like a critique of your own photos, please send them along (you can just include them in a reply to this email), and I’ll try to include them in a future email critique!
First, we have a powerful long-exposure photo from Isak A:
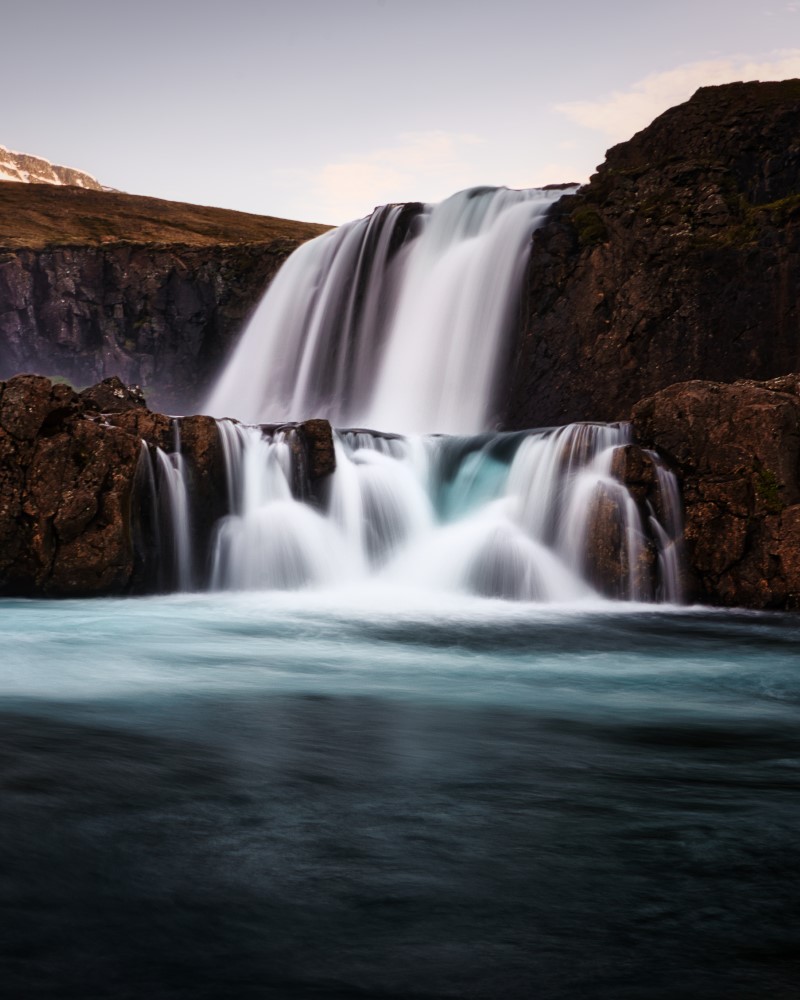
Thanks so much for sending this one along, Isak - you’ve got a lot of really good stuff going on here. You’ve got some great
colors - I like the blues in the water and how they contrast with the brown rocks - and I love your use of a slow shutter speed to create that wonderful blurred water.
I also like the compositional layering - with the water in the foreground, the waterfall in the midground, and the sky in the background - which adds depth
and often works great when photographing more scenic, expansive subjects like this.
A few ideas for improvement:
First, while I love the overall composition,
the area at the top of the frame feels a little empty to me. You have all this great texture in the water and the rocks, and it makes the bright, desaturated sky feel just a tad underwhelming.
One immediate adjustment you could make is to darken the sky in a program such as Lightroom - you might be able to bring back some
detail in the existing clouds - and you could also try adding some saturation to the sky to more closely match the intensity of the blues in the foreground.
You could also try shooting on a day with more clouds - you might be able to capture some intense sunrise or sunset fireworks that way!
Second, the details in the rocks are looking a little soft on my monitor, especially when I view the file large. This could be due to minor instability during the shooting process; with a long shutter speed photo like this one, even a bit of wind or an overloaded tripod can compromise sharpness. For long-exposure shots, I highly recommend making sure you’re using
a solid tripod and a remote release (or your camera’s two-second self-timer); I also recommend minimizing wind by removing the strap.
Regardless, I’m a fan of the image, Isak, and thanks again for sending it over!
Next, we have a lovely nature photo from Steven S:

Really nice subject here, Steven, and I love how you’ve composed around that single cluster of leaflets in the center. You also have beautiful golden-hour light - gorgeous how it makes the leaves
seem translucent! - and I love the background blur that you’ve achieved as a result of the wide aperture and the distant pinpoints of light filtering through the trees.
My one note for improvement is to try to simplify the scene further. Like I said, you’ve done a great job of including a clear focal point, and I think that the
image could benefit if you removed some of the other elements in the scene, which are a little distracting, such as the leaves in the upper corners of the image, as well as the branches running up through the frame.
I’m not sure how far away the leaf was, but using a longer lens to make the frame tighter could help. You
could also try cropping, though you’ll likely lose some detail that way, so that’s generally not an ideal approach!
Anyway, thanks so much for sharing, Steven - it’s a wonderful image, and you've got a great eye!
Third, we have a beautiful bird photo from Henry B:

First of all, Henry, in my experience, it’s tough to pull off a photo that includes three birds - often, the shot becomes a little messy or compositionally imbalanced - but you’ve done an excellent
job here!
I love how the herons’ heads and beaks form a sort of triangle, which moves the viewer’s eye around the frame. I also love the moment you’ve chosen to freeze, with the young herons’ beaks open.
I have two minor suggestions for improvement here:
First, I’d recommend cropping a bit of space off the left-hand side - right now, the composition seems slightly skewed to the right, but if you crop in just a tad, you’ll be able to offset that imbalance.
Second, there are a few branches around the birds that are a little distracting. Depending on the situation, it can be tough to eliminate these, but adjusting your position slightly can sometimes help. You can also try to zoom in or get physically closer and frame the shot more tightly, though as someone who photographs plenty of birds myself,
I know that such an approach isn’t always an option!
Thanks for sharing, Henry (and I have a real soft spot for wading bird images, myself, so double thanks for sharing!).
Fourth, we have a wonderful landscape image from Martyn W:

I’m loving the depth you’ve achieved here, Martyn, by including a foreground subject (the flowers) and by composing with the path that leads the eye toward the midground and
background.
I’m also a fan of your choice of wide-angle focal length and vertical framing, and I like the tree on the right-hand side, which acts as a nice midground focal point.
In terms of suggestions for improvement - first, while I like the foreground flowers, the grasses and other elements in the bottom left corner are a little distracting. I’d recommend working to include just the colorful blooms while excluding the other elements, perhaps by taking a step or two forward and getting down lower over the flowers.
Second, the heavy clouds are making the light a little flat, which is causing your beautiful, sweeping composition to lose some impact. If you can, I’d encourage you to come back to this scene at sunrise or sunset and reshoot, because I think the results could be outstanding!
(As an aside, I quite like overcast light for landscape photography, but when the cloud cover is heavy, I generally recommend focusing on more intimate compositions that don’t include the sky.)
Well, that’s all for now! Thanks to everyone who submitted photos, and if you’d like to have your images included
in a future critique, hit Reply and send them along!
I hope you all have a wonderful week!
Talk to you next Saturday,
Jaymes Dempsey (and the dPS team)